
A Creature's Eye
Materials:
Procedure: 1. Decide what type of creature your eye drawing will reflect...
**Keep in mind that a mammal's eye looks very different from that of a reptile or fish.**
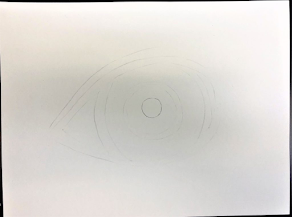
2. Draw the most important lines.
Use a tool to help you draw a circle if you need one, but remember that often we can't see the entire eyeball because of the eyelids or eyelashes.

3. Lightly erase those lines you drew.
The lines you drew will be covered up with coloring, so you only need a light guide and not a dark line in pencil.
**This may seem like a step backward, but the eye you create will have color so the pencil marks won't be needed at the end. **
4. Add texture.
Using colored pencils and crayons (or oil pastels) create different lines of texture to represent the animal you chose.
**Areas that need sharp detail should be drawn with colored pencils...Areas with a more broad and bold area can be represented with crayon or oil pastel.**
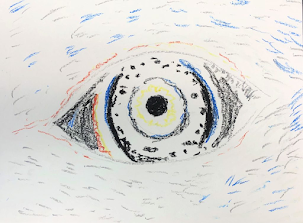
5. Watercolor!
Now with the expressive lines done in colored pencil and crayon (oil pastel), use the watercolor paint to add detail to the areas in between...Do Not leave the animal blank because most animals are not plain white (unless they are trying to camouflage in the snow). 
- sheet of paper
- pencil
- crayons/ oil pastels
- colored pencils
- water color paint
**Keep in mind that a mammal's eye looks very different from that of a reptile or fish.**
Use a tool to help you draw a circle if you need one, but remember that often we can't see the entire eyeball because of the eyelids or eyelashes.
The lines you drew will be covered up with coloring, so you only need a light guide and not a dark line in pencil.
**This may seem like a step backward, but the eye you create will have color so the pencil marks won't be needed at the end. **
Using colored pencils and crayons (or oil pastels) create different lines of texture to represent the animal you chose.
**Areas that need sharp detail should be drawn with colored pencils...Areas with a more broad and bold area can be represented with crayon or oil pastel.**
Now with the expressive lines done in colored pencil and crayon (oil pastel), use the watercolor paint to add detail to the areas in between...Do Not leave the animal blank because most animals are not plain white (unless they are trying to camouflage in the snow).
Student Examples:
 © Live Art, Breathe Art 2020
 © Live Art, Breathe Art 2020


© Live Art, Breathe Art 2020
(born 1958). American director Tim Burton was known for his original, quirky style that frequently drew on elements of the fantastic and the macabre. His work was twice nominated for Academy Awards: the full-length movies Corpse Bride (2005) and Frankenweenie (2012) were nominated for the best-animated feature film.
- Pee-Wee’s Big Adventure (1985)
- Beetlejuice (1988)
- Batman (1989)/ Batman Returns (1992)
- Edward Scissorhands (1990)
- The Nightmare Before Christmas (1993)
- The Legend of Sleepy Hollow (1999)
- Charlie and the Chocolate Factory (2005)
- And many more…...
How to create your own Tim Burton Inspired Selfie:
Teacher Example: 
© Live Art, Breathe Art 2020
Student Examples:

© Live Art, Breathe Art 2020

5 Things my fingers could become whenever I wanted them to.

- To create a story about a prince, princess, or superhero.
- To create a figure using aluminum foil based on the main character of their story.
- To make clothing for your character to wear.
Storyboard worksheet
Who, What, When, Where, and Why?
Examples of Student Work:
 |
| © Live Art, Breathe Art 2017 |
 |
| © Live Art, Breathe Art 2017 |
 |
| © Live Art, Breathe Art 2017 |
- To model clay with control.
- To build upon past knowledge in order to craft an original three-dimensional artwork.
- Through observation, investigation, and discipline, the students will create an art object demonstrating the use of the elements of art and principles of design.
- The students will use ceramic vocabulary when referring to the processes of shaping clay.
Art Vocabulary:


Litter Bug Sculptures
Objective: To create an insect out of objects that would be considered "trash" (reclaimed objects).
Mark Oliver is also a well established multi award winning illustrator for print, t.v., and children's books. A selection of his work can be seen at Olly.net
Examples of Oliver's Work:


Sketchbook
Scratch Paper
How would you generate a plan to create an insect using reclaimed material (trash)?
1. Chose from a variety of insects to create studies (drawings) of. Look closely to the body shapes, paying close attention to lines that distinguish the different parts of the bug.
- Is the sculpture proportional to the original insect
- Inventiveness of the materials used
- Insect design and construction
- Effort - Took time to develop the idea with sketches
- Craftsmanship - Neat, Clean, and Complete
- Did you use your tools in a skillful manner?
Examples of Student Work:
 |
| © Live Art, Breathe Art 2015 |
 |
| © Live Art, Breathe Art 2015 |
 |
| © Live Art, Breathe Art 2015 |
The Art of Silliness!
 |
| © Live Art, Breathe Art 2015 |
Bad Hair Day
Don't you just HATE it when your hair goes everywhere BUT where you want it to go? Ever get made fun of for it? Even our heroes and celebrities have a bad hair days.
Objective:
To give a bad hair day to an image of a person through your amazing drawing skills you have practiced this semester.
Process:
1. Find an image of a person, preferably close up?
2. Precisely cut out the image. DO NOT include the hair!
3. Using excellent composition and craftsmanship, glue the portrait onto your paper.
4. Design the new "do:" use pencil only to lightly draw the organic outline of the new bad hair.
5. Divide the hair into organic shapes (spaces).
5. Divide the hair into organic shapes (spaces).
6. Use a heavy line weight and trace the organic shapes within the hair.
7. Within the new organic spaces, create organic doodles and patterns.
Background:
1. Design the background: use a pencil and a ruler to lightly draw geometric shapes in the background.
Background:
1. Design the background: use a pencil and a ruler to lightly draw geometric shapes in the background.
2. Use a medium line weight to trace over these new shapes.
3. Within the new geometric spaces, create geometric doodles and patterns.
Did you:
- Follow direction?
- Use excellent craftsmanship, including a variety of complex lines?
- Illustrate an interesting composition (cropping, no floating, fill the space)?
- Illustrate distinct areas of organic and geometric shapes and lines?
- Use at least 3 different line weights?
You did? Excellent!
You probably just earned an A!
You probably just earned an A!
Example of Student Work:
 |
| © Live Art, Breathe Art 2015 |
Water coloring Insect Background
Looking at Insects (Part 1):
Drawing for Study
Objective:
To study what a variety of insects look like by doing studies (drawings) of them. The students will choose one insect to draw and use stippling to create value.
Materials:
Sketchbook
Pencil
Various Toy Insects
Permanent Marker
Pencil
Various Toy Insects
Permanent Marker
Watercolor Paper
Water color paint
Vocabulary:
- Center of Interest - the part of the picture that attracts the eye.
- Scale - the size of an object in relation to another object.
- Fore ground - the part of a scene nearest the viewer.
- Background - the part of the scene farthest from the viewer.
- Rule of Thirds - Is a technique designed to help artists and photographers build drama and interest in an artwork. The rule states that an artwork should be divided into nine squares of equal size, with two horizontal lines intersecting two vertical lines.
- Monumental - Larger than life size.
Art History Connection: Georgia O'Keeffe
Artists such as Georgia O'Keeffe understood how to make a small object dominate a landscape and appear larger than life. She placed natural object such as shells, flower, or bones in the foreground and made them monumental, dominating the composition.
Artists such as Georgia O'Keeffe understood how to make a small object dominate a landscape and appear larger than life. She placed natural object such as shells, flower, or bones in the foreground and made them monumental, dominating the composition.
 |
| Begins, Kim. "Value and Form. "Web log post. Mrs. Begins' Art Room. N.p., n.d. Web. |
Examples of Student Work:
 |
| © Live Art, Breathe Art 2016 |
 | |
|
 | |
|
 | |
|
 | |
|
Pablo Picasso Inspired Selfies
Recycled Collage Project
 |
| Dora Maar - Portrai de Pablo Picasso (1936) - Oil on canvas |
 |
| © 2011 Estate of Pablo Picasso/ Artists Rights Society (ARS), New York |
Digital camera
 |
| © Live Art, Breathe Art 2015 |
 |
| © Live Art, Breathe Art 2015 |
- List 5 goals in your life.
- List 5 important facts about your life.
- List 5 words that describe you.
- List 3 of your greatest fears.
- List 5 things that bring you joy.
- Draw 3 patterns you would like to see and wear.
- List 5 of your most favorite things.
- List your favorite artist, rock band, song, and quote.
- List 3-5 hobbies.
You must include your First name or Last Name or Both. You must create a design using the art element Line.
 |
| © Live Art, Breathe Art 2015 |
Storybook Figures
Hinshaw, Craig. "Storybook Figures." School Arts Magazine Dec. 2015L 27.Web.

Objective:
To create a story about a princess or a superhero.
To create a figure using aluminum foil based on the main character of their story.
To create clothing for the main character.
To create clothing for the main character.
TEKS:
Relating artistic ideas and work with personal meaning and external context
Relating artistic ideas and work with personal meaning and external context
Materials:
storyboard worksheet
storyboard worksheet
scratch paper
pencil
aluminum foil
pipe cleaners
tissue paper
glue
Think:
Who, What, When, Where, and Why?
Who, What, When, Where, and Why?
What is your character like?
Is he or she happy?
Is your character lonely?
What special powers do they have?
Does your character have the ability to fly?
Where does the story take place? (A castle, or a tower?)
Does it take place in a city with a sky scraper?
Does it take place on another planet?
To make your story more interesting your character need to have a problem!
Does it take place in a city with a sky scraper?
Does it take place on another planet?
To make your story more interesting your character need to have a problem!
Does a dragon live in the woods near the castle?
Is there a super villain who thinks he or she can defeat your super hero?
Most children's stories have a happy ending. How does your character solve his or her problem? How does your story end?
Is there a super villain who thinks he or she can defeat your super hero?
Most children's stories have a happy ending. How does your character solve his or her problem? How does your story end?
Examples of Student Work:


© Live Art, Breathe Art. 2015
|
Project 8:
Litter Bug Sculptures
Objective: To create an insect out of objects that would be considered "trash."
Art History Connection: Mark Oliver
Mark Oliver crafts insects using interesting materials.
Mark Oliver crafts insects using interesting materials.
These insects have been exhibited internationally, and sold through various galleries across the UK, as well as through direct contact with the artist.
Mark is a well established multi award winning illustrator for print, TV, children's books, and a selection of his illustrations can be seen at Olly.net.
Sample of Mark Oliver's Work:
 |
| Oliver, Mark. 'Mark Oliver's Gallery.' Mark Oliver's Portfolio. Mark Oliver's Portfolio, 2012. Web. 17 Feb. 2015 |
Materials:
sketchbook
sketchbook
toy insects and/or bugs
items that would be considered to be "trash"
Evaluation:
Is the sculpture proportional to the original bug/insect?
Is the sculpture proportional to the original bug/insect?
Inventiveness of the materials used
Bug/ Insect design and construction
Effort - Took time to develop the idea with sketches\
Craftsmanship - Neat, clean, and complete.
Did you use your tool in a skillful manner?
Examples of Student Work:
 |
| © Live Art, Breathe Art. 2015 |
 |
| © Live Art, Breathe Art. 2015 |
 |
| © Live Art, Breathe Art. 2015 |
Project 7:
Create-a-Plant
(Part 2)
Objective:
To construct a plant based on a drawn design using plastic bottles, cardboard, and paper mache'
Materials:
Materials:
sketch
pencil
pencil
masking tape
newspaper
paper mache' glue (white glue mixed with water)
your imagination
Evaluation:
Inventiveness with the cardboard
Plant design and construction
Inventiveness with the cardboard
Plant design and construction
Effort- Took time to develop the idea with sketches
Craftsmanship- Neat, clean & complete? Skillful use of the art tools & media?
Art history connection: Chris Gilmour
Chris Gilmour is a British artist who replicates cars, mopeds and bicycles by using cardboard to create
life-sized detailed sculptures.
Chris Gilmour is a British artist who replicates cars, mopeds and bicycles by using cardboard to create
life-sized detailed sculptures.
Create-a-Plant
(Part 1)
You are a botanist who has just discovered a new type of plant. As every good scientist does, you will document your exciting finding.
Objective:
Design a fact sheet highlighting your new plant discovery.
Design a fact sheet highlighting your new plant discovery.
Be sure to include the following key pieces of information:
- your plant's name
- your plant's basic needs
- how your plant's needs are met
- where your plant lives
- a colored illustration of your plant in its natural habitat
Examples of Student Work:
 |
| "Darwin Correspondence Project." >>Hitchin Picture 1. University of Cambridge, n.d. Web. 06 Feb. 2016. |
 | |
|
Project 6:
Elements of and Principles of Art:
Emphasis, Texture, and Pattern
Objective:
- To model clay with control
- Build upon past knowledge in order to craft an original three-dimensional artwork.
- Through observation, investigation and discipline, students will create an art object demonstrating the use of the elements and principles of design.
- Students will use ceramic vocabulary when referring to the processes of shaping clay objects.
Materials:
sketchbook
clay
tools for working with clay
 |
| "Art Education Daily" Ceramic Lesson Plans: Pinch Pots with Animal Features. "Art Education Daily: Ceramic Lesson Plans: Pinch Pots with Animal Features. N.p., n.d. Web 30 Jan. 2016. |
Pinch Pot Animal Examples:
 |
| "Clay Projects for Kids Grade Five and Oldeer." Clay Projects for Grade Five. N.p n.d. Web 30 Jan. 2016. |
 |
| We ❤ It. "We Heart It. N.p., nd. Web 30 Jan. 2016 |
Project 5: Making Abstract Masks Using Clay
Elements of and Principles of Art:
Emphasis, Texture, and Pattern
Vocbulary:
Objective:
To explore the amazing creations of sculptor, Kimmy Cantrell.
To look and brainstorm at what features make Cantrell's artwork unique.
To create a colorful mask using clay based on a sketch that you designed for the cardboard mask project
Materials:
cardboard mask from previous project
sketchbook
scratch paper
clay
tools for working with clay
Introduction to Clay:
Mini-Project 2:
Abstract Art - art that does not attempt to represent external reality, but seeks to achieve its effect using shapes, forms, colors, textures.
Asymmetry - the lack of equality between parts of something. Not the same on both sides.
Symmetry - it is often used to mean a kind of balance. Parts are not necessarily alike but only similar.
Art History Connection: Kimmy Cantrell
Asymmetry - the lack of equality between parts of something. Not the same on both sides.
Symmetry - it is often used to mean a kind of balance. Parts are not necessarily alike but only similar.
Art History Connection: Kimmy Cantrell
Kimmy cantrell from cdpenamtz
To explore the amazing creations of sculptor, Kimmy Cantrell.
To look and brainstorm at what features make Cantrell's artwork unique.
To create a colorful mask using clay based on a sketch that you designed for the cardboard mask project
Materials:
cardboard mask from previous project
sketchbook
scratch paper
clay
tools for working with clay
Examples of Clay Masks:
 |
| "Kimmy Cantrell Art Sculpture Gallery." Kimmy Cantrell Art Sculpture Gallery. N.p., n.d. Web. 09 Jan. 2016. |
 |
| "Kimmy Cantrell Art Sculpture Gallery." Kimmy Cantrell Art Sculpture Gallery. N.p., n.d. Web. 09 Jan. 2016. |
Introduction to Clay:
Student Work Examples:
 |
| "Shine Brite Zamorano." : Clay Kimmys. N.p., n.d. Web. 10 Jan 2016. |
Working with Symmetry
The Shape of a face
Objective: To focus on symmentrical balance by creating a face using two colors and cutting it out in halves.
 |
| © Live Art, Breathe Art 2015 |
Materials:
drawing paper
two different colors of construction paper
scissors
glue stick
Procedure:
Today we are going to make a fun face to focus on symmetrical balance.
Cut only half of the face and facial features, but when you cut, you will cut out two sheets at the same time.
Step 1:
First you need to cut out the basic shape of the head. Remember that you are only cutting out half of it. Use the edge of the paper as the center line and begin cutting any fun, exaggerated head shape. You now have the full head as you separate the two halves.
Step 2:
Put one color opposite the other and glue them down to white paper. Next, still cutting the two sheets at the same time, cut out one eye. You might want to first cut out an eye brow, then the almond shape of the eye.
Step 3:
Once you have the eye, you will need to cut it into separate parts so we can distinguish the eyeball from the eye lid.
Once you have the eye, you will need to cut it into separate parts so we can distinguish the eyeball from the eye lid.
Step 4:
Next, and again on a straight edge of your paper, cut out the half of a nose shape. Put the two halves on the top of the head shape with the opposite colors.
Step 4:
Finally, cut out the half of a mouth shape. Do the same that you did with the nose and the eyes by putting the one color on the second color. Glue all of the features down. Make a cut into the two pieces of paper to get ear shapes.
** Use your imagination to complete your work by adding other interesting shapes. You may want to make earrings, hat or a scarf. **
Have fun with this project and be as creative as you can!
Have fun with this project and be as creative as you can!
 |
| © Live Art, Breathe Art 2015 |


Project 4: Making Abstract Masks
Elements of and Principles of Art:
Emphasis, Texture, and Pattern
Vocbulary:
Abstract Art - art that does not attempt to represent external reality, but seeks to achieve its effect using shapes, forms, colors, textures.
Asymmetry - the lack of equality between parts of something. Not the same on both sides.
Symmetry - it is often used to mean a kind of balance. Parts are not necessarily alike but only similar.
Art History Connection: Kimmy Cantrell
Objective:
To explore the amazing creations of sculptor, Kimmy Cantrell.
To look and brainstorm at what features make Cantrell's artwork unique.
To create a colorful mask using cardboard based on a sketch that you designed.
Materials:
Sketchbook
pencil
eraser
markers + colored pencils
reclaimed cardboard - thick + thin + corrugated varieties
scissors
sharpie markers
elmer's glue
oil pastels
Asymmetry - the lack of equality between parts of something. Not the same on both sides.
Symmetry - it is often used to mean a kind of balance. Parts are not necessarily alike but only similar.
Art History Connection: Kimmy Cantrell
Kimmy cantrell from cdpenamtz
Objective:
To explore the amazing creations of sculptor, Kimmy Cantrell.
To look and brainstorm at what features make Cantrell's artwork unique.
To create a colorful mask using cardboard based on a sketch that you designed.
Materials:
Sketchbook
pencil
eraser
markers + colored pencils
reclaimed cardboard - thick + thin + corrugated varieties
scissors
sharpie markers
elmer's glue
oil pastels
Examples of Student Work:
 |
| Maes, Ami. "HANDMAKERY >> Masks In the Making. "HANDMAKERY RSS. N.p., 16 Mar. 2015. Web. 29 Nov. 2015 |
 |
| Maes, Ami. "HANDMAKERY >> Masks In the Making. "HANDMAKERY RSS. N.p., 16 Mar. 2015. Web. 29 Nov. 2015 |
 |
| Maes, Ami. "HANDMAKERY >> Masks In the Making. "HANDMAKERY RSS. N.p., 16 Mar. 2015. Web. 29 Nov. 2015 |
 |
| Maes, Ami. "HANDMAKERY >> Masks In the Making. "HANDMAKERY RSS. N.p., 16 Mar. 2015. Web. 29 Nov. 2015 |
 |
| Maes, Ami. "HANDMAKERY >> Masks In the Making. "HANDMAKERY RSS. N.p., 16 Mar. 2015. Web. 29 Nov. 2015 |
Project 3: Animal Silhouettes and Patterns
Elements of and Principles of Art:
Emphasis, Texture, and Pattern
Vocbulary:
Silhouette - A silhouette is an outline of something that is filled in with a solid color. Before photography was invented, it was very popular for people to pay to have their profiles cut out into silhouettes by artists.
Silhouette - A silhouette is an outline of something that is filled in with a solid color. Before photography was invented, it was very popular for people to pay to have their profiles cut out into silhouettes by artists.
 |
| Jouett, Matthew Harris. "File: Jack Jouett Silhouette.jpg. "Wikimedia Commons. Wikimedia Commons, n.d. Web 25 Oct. 2015. |
Texture - In the visual arts, texture is the surface quality of a work of art. Texture can be used to convey a variety of messages and emotions in a work of art.
Example: A giraffe looks fuzzy but the hair also looks stiff, or a squid has suction cups that look bumpy and slimy.
Rule of Thirds - The rule of thirds is applied by aligning a subject with the guide lines and intersection point, placing the horizon on the top or bottom line, or allowing linear features in the image to flow from section to section.
Art history connection:
Kara walker from cdpenamtz
Discuss:What inspires me?
How do I use the art skills I have learned to create art?
Objective:
The students will think about one subject (animal) that they will emphasize by using its skin to inspire a pattern that will cover the entire background of their painting. TSW paint the silhouette of the animal that they chose over the patterned background they painted. The students will also use the "rule of thirds" to create their composition.
Materials:The students will think about one subject (animal) that they will emphasize by using its skin to inspire a pattern that will cover the entire background of their painting. TSW paint the silhouette of the animal that they chose over the patterned background they painted. The students will also use the "rule of thirds" to create their composition.
Drawing paper
Pencil
Plastic Toy Animals
Canvas Board (subject to change based on supplies)
Acrylic paint
Apron
Examples of Student Work:
 |
| Spector, Laura. "Art Lesson For Kids. - Animal Silhouettes and Patterns. "HubPages. N.p., n.d. Web. 25 Oct. 2015. |
 |
| Spector, Laura. "Art Lesson For Kids. - Animal Silhouettes and Patterns. "HubPages. N.p., n.d. Web. 25 Oct. 2015. |
1. Start by choosing your favorite animal and think about what pattern its skin or fur had. Also think about the texture on its skin or fur.
2. Lightly draw the pattern of your animal's skin or fur across your canvas board.
3. Using acrylic paint, fill in the colors inside your pattern. As you do this, think about what the texture might feel like and how you can convey that in your line quality. If your texture is fuzzy, use short soft strokes. If your texture is spiky, use long specific strokes. If it is bumpy like the octopus in the examples, white areas were left around the suction cups to show that they were raised above the skin.
4. When your background is complete and dry, lightly draw the outline of your animal carefully. Don't forget to include specific parts of its body that helps identify it onto your canvas board.
5. Give your artwork an original title and turn it in for a grade. Don't forget to include your name, date, and period on the back of your work.
Project 2: Making the Small Monumental
Elements of and Principles of Art:
Emphasis, Balance, and Unity
Vocbulary:
Vocbulary:
Center of interest
Scale
Foreground
Background
Rule of Thirds
Scale
Foreground
Background
Rule of Thirds
Art History Connection:
Artists such as Georgia O'Keeffe understood how to make a small object dominate a landscape and appear larger than life She placed natural objects such as shells, flowers, or bones in the foreground and made them monumental, dominating the composition.
Artists such as Georgia O'Keeffe understood how to make a small object dominate a landscape and appear larger than life She placed natural objects such as shells, flowers, or bones in the foreground and made them monumental, dominating the composition.
Georgia O'Keefe - Life and Art Video
Discuss:
Objective:
The students will think about one subject (object) that they will emphasize. This will be the largest object in an imaginary landscape, perhaps the one that appears closest in their art work. The students will use the "rule of thirds" to create their composition.
Materials:
Drawing paper
Pencil
Oil Pastels
Small Objects (shells, flowers, bones, model cars)
Apron
Directions:
1. Use a pencil to lightly draw a 1-inch border all the way around your paper to keep from smearing pastels on your desk. Decide what your object will be and draw it on an "intersection." Make the object at least as large as your open hand.
2. Decide what would really be a strange location for your object to be in. Try to think of an "environment" that is not normal for your subject. Have you ever heard the expression "a fish out of water"?
3. After completing the pencil drawing, you will use pastels to color the whole page. Oil pastels are similar to crayon, but a little messier. They are most beautiful when they are colored firmly. You can add one color on top of another, and even scratch designs through top layer to show those underneath.
4. Remember, except for the one real object, this is an imaginary drawing. Consider using unrealistic colors. Tress don't always have to have brown trunks and green leaves, and skies don't always have to be blue. You may even choose to use a "color scheme" based on analogous or complementary colors.
5. When you are finished you must give your artwork a title.
- What does the word monumental mean?
- Think of things and/ or objects that are smaller than a hand and write a list in your sketchbook
- What do you think we could find in an imaginary landscape?
Objective:
The students will think about one subject (object) that they will emphasize. This will be the largest object in an imaginary landscape, perhaps the one that appears closest in their art work. The students will use the "rule of thirds" to create their composition.
Materials:
Drawing paper
Pencil
Oil Pastels
Small Objects (shells, flowers, bones, model cars)
Apron
Directions:
1. Use a pencil to lightly draw a 1-inch border all the way around your paper to keep from smearing pastels on your desk. Decide what your object will be and draw it on an "intersection." Make the object at least as large as your open hand.
2. Decide what would really be a strange location for your object to be in. Try to think of an "environment" that is not normal for your subject. Have you ever heard the expression "a fish out of water"?
3. After completing the pencil drawing, you will use pastels to color the whole page. Oil pastels are similar to crayon, but a little messier. They are most beautiful when they are colored firmly. You can add one color on top of another, and even scratch designs through top layer to show those underneath.
4. Remember, except for the one real object, this is an imaginary drawing. Consider using unrealistic colors. Tress don't always have to have brown trunks and green leaves, and skies don't always have to be blue. You may even choose to use a "color scheme" based on analogous or complementary colors.
5. When you are finished you must give your artwork a title.
"Rule of Thirds" Video 1:
"Rule of Thirds" Video 2:
Oil Pastel Techniques
Project 1:
Body Language
* What is a metaphor?
A metaphor is a word of phrase that is used to make a comparison between two people, things, animals, or places.
Examples:
- The hospital was a refrigerator.
- The snow is a white blanket.
- The slide on the playground was a hot stove.
- He is a walking dictionary.
Objective:
Students will respectfully, humorously, and appropriately create unique art depicting the various nicknames for human body parts. (No Private Parts!)
Materials:
Pencils
Sketchbook
Watercolors
Permanent Marker
Watercolor paper
Crayons
Students will respectfully, humorously, and appropriately create unique art depicting the various nicknames for human body parts. (No Private Parts!)
Materials:
Pencils
Sketchbook
Watercolors
Permanent Marker
Watercolor paper
Crayons
Procedure:
1. Think about how we refer to the different parts of our bodies: Our heart is a ticker and we think with our noodle. Our eyes are windows out to the world or into our soul, and our nose is a beak or a honker. Our toes are piggies, but they can also twinkle and so can our eyes. Our knees knock and we can shake like a leaf. There is a button in our belly and a zipper on our lips.
Brainstorm and list these various colloquiailsms, plus many others with your table. (Colloquialism is a word or expression used in or suited to familiar and informal conversation.)
2. Choose one colloquialism from the list to illustrate as a thumbnail sketch on a full page in your sketch book.
3. Once the teacher has approved your sketch, the students may transfer their final sketch to watercolor paper, using crayon and permanent marker. The students may apply watercolor as desired.
4. The students must title their finished work.
Assessment:
* The student worked within the accepted parameters of the lesson.
*The student clearly expressed his or her idea in the artwork
*The student came up with original title
 |
| Bellet, Laurie. "Body Language." School Arts Nov. 2014: 9-10. Print. |
No comments:
Post a Comment